단어 추출 도구(4): 단어 추출 도구 소스코드 설명(1)
Python으로 구현한 단어 추출 도구 소스코드 에 대해 살펴본다.
이전 글에서 이어지는 내용이다.
단어 추출 도구(3): 단어 추출 도구 실행 방법과 결과 확인 방법
4. 단어 추출 도구 소스코드
4.1. 개요
4.1.1. 소스코드 일러두기
이 단어 추출 도구의 소스코드는 내가 Python으로 만든 쓸만한 도구중에 거의 첫번째로 작성한 코드이다. 아직 손에 익지 않았을 때 필요한 기능을 구현하는데에만 중점을 두다 보니 Python의 장점인 간결함과는 거리가 멀다. Python 스타일이라기 보다는 C 스타일에 가깝다.
텍스트 추출 결과, 단어 추출 결과를 별도의 class로 작성할까 하다가, 시험삼아 pandas의 DataFrame을 사용해 봤는데 생각보다 잘 동작해서 그냥 DataFrame을 사용했다. 덤으로 DataFrame에서 제공하는 groupby, to_excel 함수를 사용하여 구현하는데 시간을 많이 줄였다.
“2.1.2. 형태소 분석기 선택: Mecab“에서 언급했듯이, 단어 추출에 자연어 형태소 분석기 Mecab을 사용했다. 다른 형태소 분석기를 사용하려면 get_word_list 함수를 고쳐 사용하기 바란다.
본문에 삽입한 코드의 행 번호는 github에 업로드한 소스코드의 행번호와 같게 설정하였고, 주석도 가급적 제외하지 않고 모두 포함시켰다.
4.1.2.단어 추출 도구 함수 호출 관계
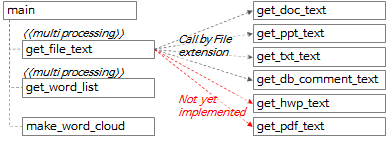
함수 전반적인 호출 관계는 위 도식과 아래 내용과 같이 요약할 수 있다.
- main 함수에서 get_file_text 함수를 호출해서 각 파일로부터 행단위, 문단(paragraph) 단위의 텍스트를 추출한다.
- get_file_text 함수 내에서 파일 확장자에 따라 get_doc_text, get_ppt_text, get_txt_text, get_db_comment_text 함수를 호출한다.
- get_hwp_text, get_pdf_text 함수는 아직 구현하지 않았고 나중에 필요한 시점에 구현할 예정이다. (혹시 구현한 경험이 있거나 구현한 코드를 알고 있다면 댓글로 남겨주기 바란다.)
- get_file_text 함수 실행결과를 get_word_list 함수에 전달하여 단어 후보군을 추출한다.
- get_file_text 함수와 get_word_list 함수는 multiprocessing으로 처리한다.
- make_word_cloud 함수를 호출하여 word cloud 이미지를 생성한다.
4.2. main 함수
4.2.1. argument parsing
def main():
    """
    지정한 경로 하위 폴더의 File들에서 Text를 추출하고 각 Text의 명사를 추출하여 엑셀파일로 저장
    :return: 없음
    """

    # region Args Parse & Usage set-up -------------------------------------------------------------
    # parser = argparse.ArgumentParser(usage='usage test', description='description test')
    usage_description = """--- Description ---
  * db_comment_file과 in_path중 하나는 필수로 입력

  * 실행 예시
    1. File에서 text, 단어 추출: in_path, out_path 지정
       python word_extractor.py --multi_process_count 4 --in_path .\\test_files --out_path .\out

    2. DB comment에서 text, 단어 추출: db_comment_file, out_path 지정
       python word_extractor.py --db_comment_file "table,column comments.xlsx" --out_path .\out

    3. File, DB comment 에서 text, 단어 추출: db_comment_file, in_path, out_path 지정
       python word_extractor.py --db_comment_file "table,column comments.xlsx" --in_path .\\test_files --out_path .\out

  * DB Table, Column comment 파일 형식
    - 첫번째 sheet(Table comment): DBName, SchemaName, Tablename, TableComment
    - 두번째 sheet(Column comment): DBName, SchemaName, Tablename, ColumnName, ColumnComment"""

    # ToDo: 옵션추가: 복합어 추출할지 여부, 영문자 추출할지 여부, 영문자 길이 1자리 제외여부, ...
    parser = argparse.ArgumentParser(description=usage_description, formatter_class=argparse.RawTextHelpFormatter)
    # name argument 추가
    parser.add_argument('--multi_process_count', required=False, type=int,
                        help='text 추출, 단어 추출을 동시에 실행할 multi process 개수(지정하지 않으면 (logical)cpu 개수로 설정됨)')
    parser.add_argument('--db_comment_file', required=False,
                        help='DB Table, Column comment 정보 파일명(예: comment.xlsx)')
    parser.add_argument('--in_path', required=False, help='입력파일(ppt, doc, txt) 경로명(예: .\in) ')
    parser.add_argument('--out_path', required=True, help='출력파일(xlsx, png) 경로명(예: .\out)')

    args = parser.parse_args()

    if args.multi_process_count:
        multi_process_count = int(args.multi_process_count)
    else:
        multi_process_count = multiprocessing.cpu_count()

    db_comment_file = args.db_comment_file
    if db_comment_file is not None and not os.path.isfile(db_comment_file):
        print('db_comment_file not found: %s' % db_comment_file)
        exit(-1)

    in_path = args.in_path
    out_path = args.out_path
    print('------------------------------------------------------------')
    print('Word Extractor v%s start --- %s' % (_version_, get_current_datetime()))
    print('##### arguments #####')
    print('multi_process_count: %d' % multi_process_count)
    print('db_comment_file: %s' % db_comment_file)
    print('in_path: %s' % in_path)
    print('out_path: %s' % out_path)
    print('------------------------------------------------------------')
- 395행: argparse package의 ArgumentParser 객체를 생성한다.
- 397~404행: 필요한 argument를 추가하고 실행시 지정한 argument를 parsing한다.
- 406~425행: argument를 내부 변수로 설정하고, 설정된 값을 출력한다.
4.2.2. 처리할 파일 목록 추출
    file_list = []
    if in_path is not None and in_path.strip() != '':
        print('[%s] Start Get File List...' % get_current_datetime())
        in_abspath = os.path.abspath(in_path)  # os.path.abspath('.') + '\\test_files'
        file_types = ('.ppt', '.pptx', '.doc', '.docx', '.txt')
        for root, dir, files in os.walk(in_abspath):
            for file in sorted(files):
                # 제외할 파일
                if file.startswith('~'):
                    continue
                # 포함할 파일
                if file.endswith(file_types):
                    file_list.append(root + '\\' + file)

        print('[%s] Finish Get File List.' % get_current_datetime())
        print('--- File List ---')
        print('\n'.join(file_list))


    if db_comment_file is not None:
        file_list.append(db_comment_file)
- 436행: 처리 대상 파일에 해당하는 파일 확장자 목록을 정의한다.
- 437~444행: 실행시 지정한 argument중 in_path 하위의 폴더 전체를 재귀 탐색하면서 각 파일이 대상 파일인지 판단하고 대상 파일이면 file_list에 추가한다.
- 451~452행: 실행시 지정한 argument중 db_comment_file이 있으면 file_list에 추가한다.
4.2.3. Multi processing으로 get_file_text 실행
    print('[%s] Start Get File Text...' % get_current_datetime())
    with multiprocessing.Pool(processes=multi_process_count) as pool:
        mp_text_result = pool.map(get_file_text, file_list)
    df_text = pd.concat(mp_text_result, ignore_index=True)
    print('[%s] Finish Get File Text.' % get_current_datetime())
    # 여기까지 text 추출완료. 아래에 단어 추출 시작
- 455~456행: 실행시 지정한 multi_process_count 만큼 process를 실행하여 각 process에서 file_lsit를 입력으로 get_file_text 함수를 실행하고 그 결과를 mp_text_result에 담는다.
- 457행: DataFrame의 list 형태인 mp_text_result의 각 list item을 합쳐서(concat) 하나의 DataFrame인 df_text로 만든다.
4.2.4. Multi processing으로 get_word_list 실행
    # ---------- 병렬 실행 ----------
    print('[%s] Start Get Word from File Text...' % get_current_datetime())
    df_text_split = np.array_split(df_text, multi_process_count)
    # mp_result = []
    with multiprocessing.Pool(processes=multi_process_count) as pool:
        mp_result = pool.map(get_word_list, df_text_split)

    df_result = pd.concat(mp_result, ignore_index=True)
    if 'DB' not in df_result.columns:
        df_result['DB'] = ''
        df_result['Schema'] = ''
        df_result['Table'] = ''
        df_result['Column'] = ''

    print('[%s] Finish Get Word from File Text.' % get_current_datetime())
    # ------------------------------
- 463행: df_text의 행을 multi_process_count로 분할하여 각 분할된 DataFrame을 df_text_split(list type)에 담는다.
- 예를 들어, df_text에 1000개의 행이 있고 multi_process_count가 4인 경우라면, 각각 250개 행을 가진 4개의 DataFrame이 만들어지고 이 4개의 DataFrame을 item으로 가지는 df_text_split 변수가 만들어진다.
- 465~466행: 실행시 지정한 multi_process_count 만큼 process를 실행하여 각 process에서 df_text_split을 입력으로 get_word_list 함수를 실행하고 그 결과를 mp_result에 담는다.
- 468행: DataFrame의 list 형태인 mp_result의 각 list item을 합쳐서(concat) 하나의 DataFrame인 df_result로 만든다.
- 469~473행: df_result.columns에 ‘DB’가 없는 경우, 다시 말하여 db_comment_file 이 지정되지 않은 경우 후속 처리 로직을 단순화하고 오류를 방지하기 위하여 ‘DB’, ‘Schema’, ‘Table’, ‘Column’의 이름을 가진 열(column)을 빈 값으로 추가한다.
4.2.5. 단어 빈도를 구하고 make_word_cloud 실행
    print('[%s] Start Get Word Frequency...' % get_current_datetime())
    # df_group = pd.DataFrame(df_result.groupby(by='Word').size().sort_values(ascending=False))
    df_result_subset = df_result[['Word', 'Source']]  # 빈도수를 구하기 위해 필요한 column만 추출
    # df_group = df_result_subset.groupby(by='Word').agg(['count', lambda x: list(x)])
    df_group = df_result_subset.groupby(by='Word').agg(['count', lambda x: '\n'.join(list(x)[:10])])
    df_group.index.name = 'Word'  # index명 재지정
    df_group.columns = ['Freq', 'Source']  # column명 재지정
    df_group = df_group.sort_values(by='Freq', ascending=False)
    print('[%s] Finish Get Word Frequency.' % get_current_datetime())
    # df_group['Len'] = df_group['Word'].str.len()
    # df_group['Len'] = df_group['Word'].apply(lambda x: len(x))
    print('[%s] Start Make Word Cloud...' % get_current_datetime())
    now_dt = datetime.datetime.now().strftime("%Y%m%d%H%M%S")
    make_word_cloud(df_group, now_dt, out_path)
    print('[%s] Finish Make Word Cloud.' % get_current_datetime())
- 480행: df_result에서 ‘Word’, ‘Source’ 컬럼만 골라 df_result_subset DataFrame을 만든다.
- 482행: df_result_subset에 ‘Word’ 컬럼으로 grouping하여 count를 구하고, ‘Source’중 처음 10개의 값을 추출하여 행분리 기호로 연결하여 df_group DataFrame을 만든다.
- 483~484행: df_group DataFrame의 index명을 ‘Word’로, column명을 각각 ‘Freq’, ‘Source’로 지정한다.
- 485행: df_group을 ‘Freq'(단어 빈도)로 역순정렬한다.
- 491행: df_group을 make_word_cloud 함수에 전달하여 word cloud 이미지를 생성하고 저장한다.
4.2.6. 추출된 단어 목록과 단어 빈도 엑셀 파일로 저장하고 실행시간 출력, 종료
    print('[%s] Start Save the Extract result to Excel File...' % get_current_datetime())
    df_result.index += 1
    excel_style = {
        'font-size': '10pt'
    }
    df_result = df_result.style.set_properties(**excel_style)
    df_group = df_group.style.set_properties(**excel_style)
    out_file_name = '%s\\extract_result_%s.xlsx' % (out_path, now_dt)  # 'out\\extract_result_%s.xlsx' % now_dt

    print('start writing excel file...')
    with pd.ExcelWriter(path=out_file_name, engine='xlsxwriter') as writer:
        df_result.to_excel(writer,
                           header=True,
                           sheet_name='단어추출결과',
                           index=True,
                           index_label='No',
                           freeze_panes=(1, 0),
                           columns=['Word', 'FileName', 'FileType', 'Page', 'Text', 'DB', 'Schema', 'Table', 'Column'])
        df_group.to_excel(writer,
                          header=True,
                          sheet_name='단어빈도',
                          index=True,
                          index_label='단어',
                          freeze_panes=(1, 0))
        workbook = writer.book
        worksheet = writer.sheets['단어빈도']
        wrap_format = workbook.add_format({'text_wrap': True})
        worksheet.set_column("C:C", None, wrap_format)

    # print('finished writing excel file')
    print('[%s] Finish Save the Extract result to Excel File...' % get_current_datetime())

    end_time = time.time()
    # elapsed_time = end_time - start_time
    elapsed_time = str(datetime.timedelta(seconds=end_time - start_time))
    print('------------------------------------------------------------')
    print('[%s] Finished.' % get_current_datetime())
    print('overall elapsed time: %s' % elapsed_time)
    print('------------------------------------------------------------')
- 495~501행: 엑셀 글꼴 크기를 10 point로 지정하고, 저장할 엑셀 파일의 경로와 파일명을 설정한다.
- 504~521행: pandas ExcelWriter를 이용하여 df_result, df_group DataFrame을 엑셀파일로 저장한다.
- 526~532행: 실행에 걸린 시간을 계산하여 출력하고 종료한다.
내용이 길어져서 글을 두 개로 나누어 올린다. 다음 글에 계속된다.
<< 관련 글 목록 >>


안녕하세요
올려주신 단어 추출 도구 소드코드와 ‘pdfplumber’를 활용하여 get_pdf_text 기능 만들어보았는데
댓글이나 메일로 보여드려도 될까요?
안녕하세요!
올려주신 단어 추출 도구 소스 코드를 활용하여 get_pdf_text 함수 구현해보았습니다.
기존 코드 중 파일 확장자 관련 부분에 pdf 추가하고 get_pdf_tex 함수 추가했을 때 작동하는 것은 확인했습니다.
수정해야 할 부분 알려주시면 처리하겠습니다.
pip install pdfplumber가 필요합니다.
import pdfplumber
def get_pdf_text(file_name) -> DataFrame:
start_time = time.time()
print(‘\r\nget_txt_text: ‘ + file_name)
df_text = pd.DataFrame()
pdf_file = pdfplumber.open(file_name)
page = 0
for pg in pdf_file.pages:
texts = pg.extract_text()
page += 1
for text in texts.split():
if text.strip() != ”:
sr_text = Series([file_name, ‘pdf’, page, text, f'{file_name}:{page}:{text}’],
index=[‘FileName’, ‘FileType’, ‘Page’, ‘Text’, ‘Source’])
df_text = df_text.append(sr_text, ignore_index=True)
print(‘text count: %s’ % str(df_text.shape[0]))
print(‘page count: %d’ % page)
pdf_file.close()
end_time = time.time()
elapsed_time = str(datetime.timedelta(seconds=end_time – start_time))
print(‘[pid:%d] get_pdf_text elapsed time: %s’ % (os.getpid(), elapsed_time))
return df_text
get_pdf_text 함수 소스코드 공유해 주셔서 감사합니다.
작성해주신 소스코드는 들여쓰기가 되어 있는데, WordPress 댓글에서 들여쓰기가 표시되지 않아 보기가 조금 불편하네요.
들여쓰기가 보여지도록 설정해 보겠습니다.
들여쓰기 보이게 설정하실 때 혹시 들여쓰기 되어있는 원본 소스코드 필요하시면 다시 올려드리겠습니다.