Excel VBA Courses (9): Excel VBA How-To
This article examines the Excel VBA How-To. Please refer to it when coding Excel VBA.
This is a continuation of the previous article.
Excel VBA Course (8): Excel VBA Language Basics - Data Types, Data Structures
4. Excel VBA How-To
4.1. How to configure UI (User Interface)
In Excel VBA, there are three ways to configure the UI, such as receiving values from the user or showing the progress.
4.1.1. UI using Excel Sheet
This is the most common method. Add controls such as buttons, text boxes, and check boxes to the Excel Sheet and handle events. It is the easiest to implement and convenient to use as you can click a button while looking at the data.
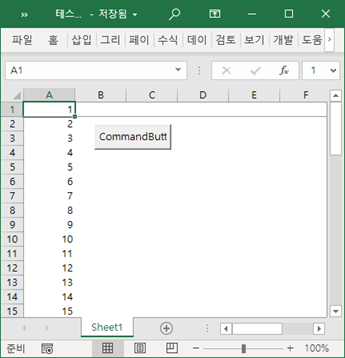
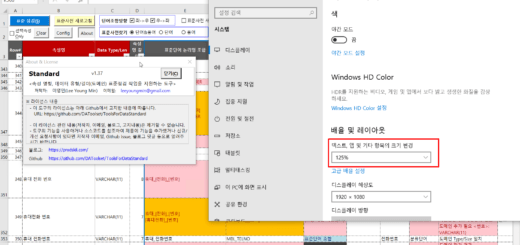
This method has one drawback. If you click a button after the screen resolution is changed, the size of the button continues to increase or the size of the text decreases. Mainly, when the external monitor is changed or connected to a beam projector, the screen resolution is changed, and this phenomenon almost always occurs if the excel sheet containing the control is open at that time. This phenomenon occurs when an ActiveX control is used and does not occur when a form control is used.
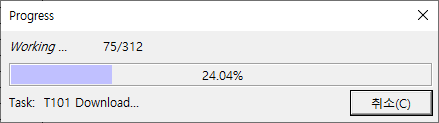
4.1.2. UI using User Form
This is a method of handling events by creating a separate UserForm object and adding controls to it.

It may not be suitable for working while inputting/modifying data, such as a list of input values, as it may cover the screen. As shown in the figure below, it is suitable for displaying information such as ProgressBar.
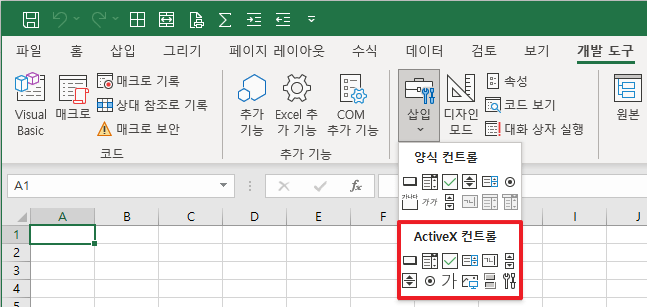
4.1.2. UI using Ribbon Bar
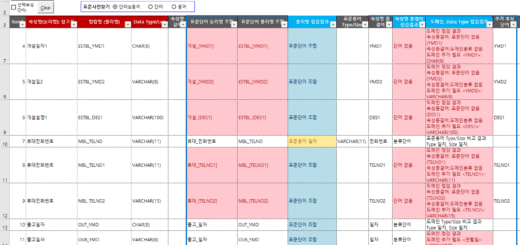
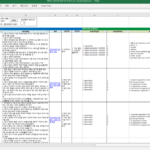
This is the most labor intensive and complicated method. Add custom tabs and buttons to the Ribbon Bar interface, which has been changed since Excel 2007, and handle events. Here is an example of a custom Ribbon Bar that a junior employee made and sent to me a few years ago.
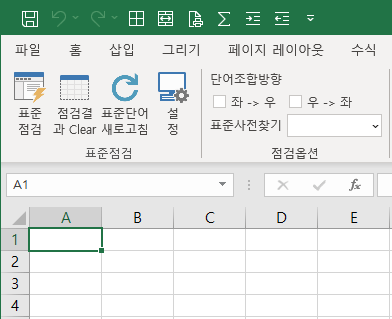
Data Standards Checking Tool (* Note: Data Standard Check Tool Description Contents , Download) provided the UI in Excel Sheet, but if you change it to Ribbon bar UI, it will be similar to the above.
The content of the ribbon bar is quite extensive on its own, so I will organize it in a separate article later. See below.
- https://docs.microsoft.com/en-us/archive/msdn-magazine/2007/february/extend-office-2007-with-your-own-ribbon-tabs-and-controls
- https://docs.microsoft.com/en-us/office/vba/library-reference/concepts/overview-of-the-office-fluent-ribbon
4.2. How to run VBA code
There are at least three ways to run VBA code.
4.2.1. Fire on button click event
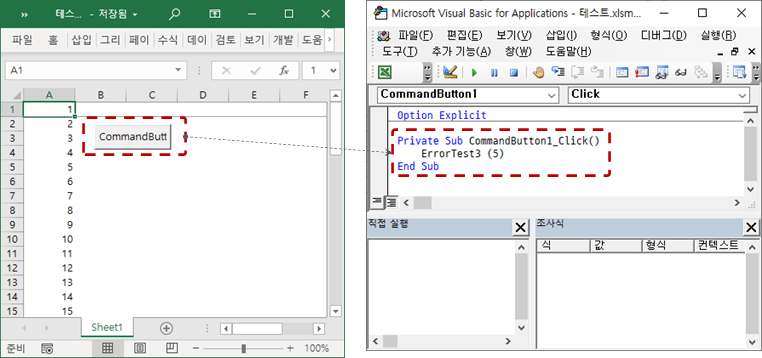
This is how to create a button as shown in the figure above and write a statement that executes VBA code in the click event of the button. This is suitable when providing a way to run it in the UI.
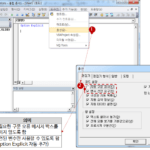
4.2.2. Place the cursor on the source code to be executed and execute it with a shortcut key

Place the cursor on the Sub or Function procedure code in VBE (Visual Basic Editor) and press the shortcut key. F5run with You can also click the run button (▶️) on the toolbar. This method only works for Sub and Function procedures without parameters.
This method is suitable for simple testing when there is no need to externally provide an execution method.
4.2.3. Run in the Immediate Window
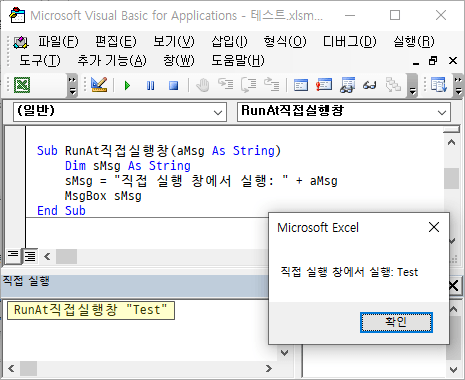
This method is to enter the name and parameter of a Sub or Function procedure in the Immediate Execution window and press the Enter key to execute it. This method is suitable for simple testing of Sub and Function procedures with parameters.
4.3. How to use the Immediate Window tool
The Immediate Execution window can be used for a variety of purposes, such as debugging and message output, in addition to macro execution as discussed above.
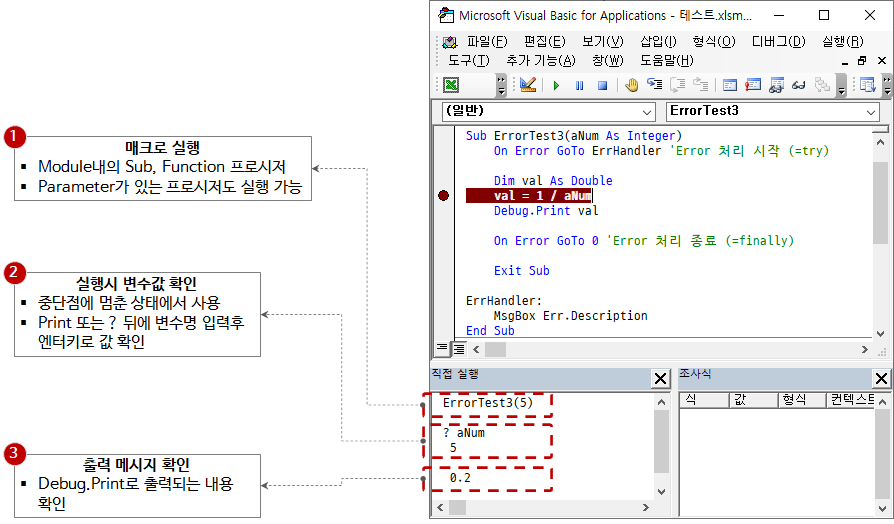
- run macro
- Execute by entering the name of the sub or function procedure in the module
- Procedures with parameters can also be executed
- Check variable values at run time
- Used while stopping at a breakpoint
- Print or ? After entering the variable name, confirm the value with the Enter key.
- Check output message
- Check the output with Debug.Print
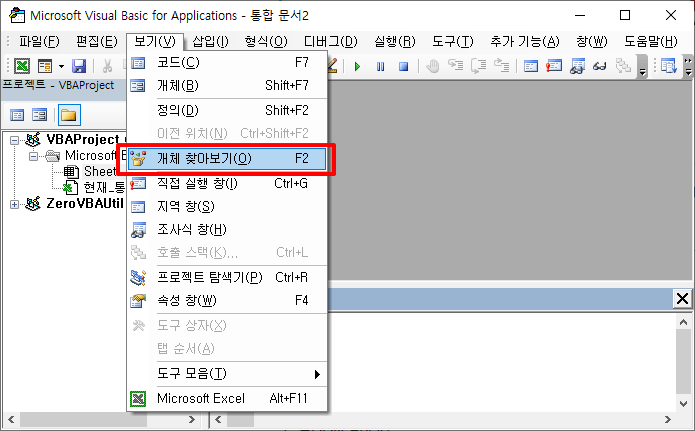
4.4. How to use the object browse tool
previous post Excel VBA Course (3): Excel Object Model I took a quick look at the object browse tool in .
Execute 'Browse Object' in the VBE 'View' menu. Shortcut is F2 am.
The object browsing tool is composed of the following.

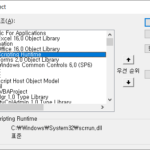
- Filter & Search
- You can check the list of all libraries that are provided by default in Excel and libraries that have been added as references, and select a specific library.
- The entire library list can be searched by class name or member name.
- class list
- Shows a list of all classes, modules, and enums under the selected library.
- member list
- Shows the list of procedures, functions, properties, etc. that are members of the class or module selected in the class list.
- member information
- Shows the details of the procedure, function, property, etc. selected from the member list.
The types of icons displayed in the object search tool and their meanings are as follows.
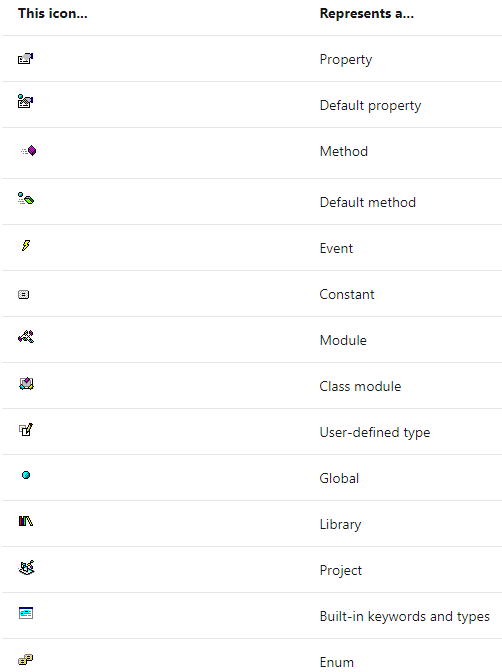
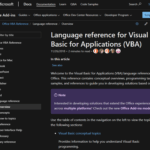
For more information on the object browse tool, refer to the URL below.
https://docs.microsoft.com/en-us/office/vba/language/reference/user-interface-help/object-browser
4.5. How to improve VBA performance
How to improve VBA performance is written in a separate article.
VBA Coding Patterns: Improving VBA Performance
To summarize the above article, set the global variable to a performance improvement value before entering the code to be processed, and change it to the original value after the processing code is finished. Please refer to the following code.
'코드 진입 부분
Application.ScreenUpdating = False
Application.Calculation = xlCalculationManual
Application.EnableEvents = False
Application.DisplayAlerts = False

'실행할 코드가 들어 갈 부분
...

'코드 종료 부분
Application.ScreenUpdating = True
Application.Calculation = xlCalculationAutomatic
Application.EnableEvents = True
Application.DisplayAlerts = True
4.6. How to use the macro recorder
Excel's macro recorder is very useful. For example, if you're creating a new pivot table, a new chart, or don't know how to write repetitive tasks in VBA code, the macro recorder can be of great help.
If you start the macro recorder, process a task using the keyboard or mouse, and then stop the macro recorder, you can see that the details of the work processed so far are written in VBA code. It is possible to code much faster and more accurately by modifying and using the code created in this way than writing VBA code from scratch.
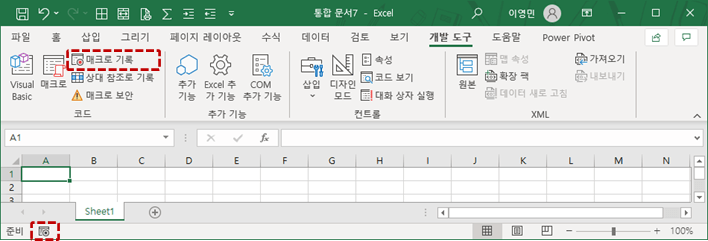
Macro recording starts by clicking the 'Record Macro' button on the Developer tab or the bottom status bar as follows.
If you click the 'Record Macro' button, a window to enter the macro name, shortcut key, save location, and description appears as follows.

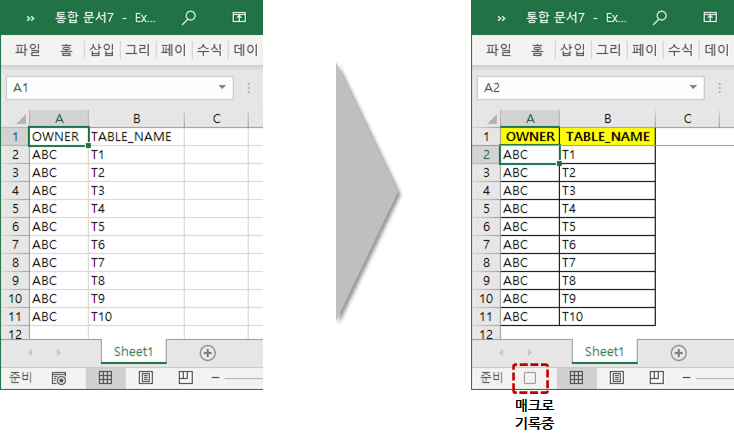
If you click the 'OK' button after entering the macro information, the recording state is changed as follows.

Let's record the pasted data's border designation, Header setting (background color, font, center alignment), grid line hiding, and freeze frame functions with the macro recorder. If you start macro recording and execute the function using the keyboard or mouse, the result is as shown on the right side of the figure below.
Stop macro recording and check the generated VBA code as follows.
Sub 매크로1()
'
' 매크로1 매크로
'
    Columns("A:B").Select
    Columns("A:B").EntireColumn.AutoFit
    Range("A1:B11").Select
    Selection.Borders(xlDiagonalDown).LineStyle = xlNone
    Selection.Borders(xlDiagonalUp).LineStyle = xlNone
    With Selection.Borders(xlEdgeLeft)
        .LineStyle = xlContinuous
        .ColorIndex = xlAutomatic
        .TintAndShade = 0
        .Weight = xlThin
    End With
    With Selection.Borders(xlEdgeTop)
        .LineStyle = xlContinuous
        .ColorIndex = xlAutomatic
        .TintAndShade = 0
        .Weight = xlThin
    End With
    With Selection.Borders(xlEdgeBottom)
        .LineStyle = xlContinuous
        .ColorIndex = xlAutomatic
        .TintAndShade = 0
        .Weight = xlThin
    End With
    With Selection.Borders(xlEdgeRight)
        .LineStyle = xlContinuous
        .ColorIndex = xlAutomatic
        .TintAndShade = 0
        .Weight = xlThin
    End With
    With Selection.Borders(xlInsideVertical)
        .LineStyle = xlContinuous
        .ColorIndex = xlAutomatic
        .TintAndShade = 0
        .Weight = xlThin
    End With
    With Selection.Borders(xlInsideHorizontal)
        .LineStyle = xlContinuous
        .ColorIndex = xlAutomatic
        .TintAndShade = 0
        .Weight = xlThin
    End With
    Range("A1:B1").Select
    Selection.Font.Bold = True
    With Selection
        .HorizontalAlignment = xlCenter
        .VerticalAlignment = xlCenter
        .WrapText = False
        .Orientation = 0
        .AddIndent = False
        .IndentLevel = 0
        .ShrinkToFit = False
        .ReadingOrder = xlContext
        .MergeCells = False
    End With
    With Selection.Interior
        .Pattern = xlSolid
        .PatternColorIndex = xlAutomatic
        .Color = 65535
        .TintAndShade = 0
        .PatternTintAndShade = 0
    End With

    Range("A2").Select
    ActiveWindow.FreezePanes = True

    ActiveWindow.DisplayGridlines = False
End Sub
Analyzing this code:
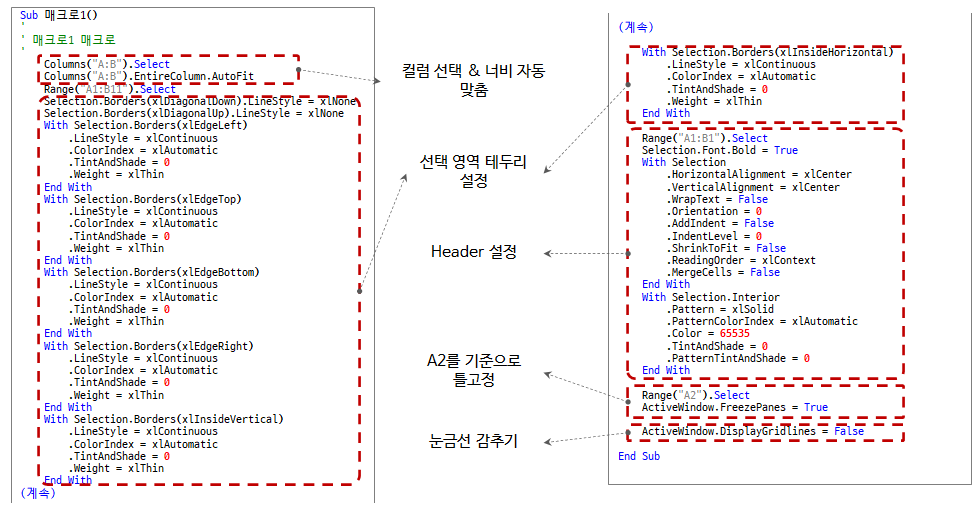
Even if you are not familiar with Excel Object Model or VBA syntax, you can create useful macros by using the VBA code created in this way. If you use the macro recorder well, VBA coding becomes easy.
For reference, Excel is the only macro recorder among the Ms-Office suites.
4.7. Basic principles to follow when coding
It is recommended to keep the following basic principles when coding using Excel VBA.
- Do not put the changed value inside, but receive input from the outside (UI).
- Don't structure it as a Module/Class from the beginning, focus only on the purpose of the implementation at first.
- Structuring takes additional time, which should not affect the original work schedule.
- VBA is a means (tool), not an end. Be careful not to turn over.
- If it is used more than 3 times or if it is clear that it will be used continuously in the future, refactor and structure it into Module/Class considering reusability. (Make -> Copy -> Refactoring)
In this article, we looked at how-tos that are good to know when coding Excel VBA. Next, we will look at examples of tools developed and used with Excel VBA. This will be the last post of the Excel VBA lecture.
<< Related article list >>
- Start the Excel VBA course. (Lecture notice, feat. Why we recommend Excel VBA)
- Excel VBA Course(1): Overview of Excel VBA
- Excel VBA Course (2): Excel VBA Basics
- Excel VBA Course (3): Excel Object Model
- Excel VBA Course (4): Working with Excel Object Model
- Excel VBA Course (5): Excel File Extension, VBE, Font Settings
- Excel VBA Course (6): Excel VBA Language Basics - Variables
- Excel VBA Course (7): Excel VBA Language Basics - Syntax
- Excel VBA Course (8): Excel VBA Language Basics - Data Types, Data Structures
- Excel VBA Courses (9): Excel VBA How-To
- Excel VBA Course (10): Tools developed and used with Excel VBA
- Full Table of Contents for Excel VBA Courses
Related articles:
 Excel VBA Course (10): Tools developed and used with Excel VBA
 Excel VBA Course (8): Excel VBA Language Basics - Data Types, Data Structures
 Excel VBA Course (7): Excel VBA Language Basics - Syntax
 Excel VBA Course (6): Excel VBA Language Basics - Variables
 Excel VBA Course (5): Excel File Extension, VBE, Font Settings
 Excel VBA Course (2): Excel VBA Basics
 Excel VBA Course(1): Overview of Excel VBA
 Start the Excel VBA course. (Lecture notice, feat. Why we recommend Excel VBA)