分词工具(四):分词工具源码说明(一)
检查用 Python 实现的单词提取工具的源代码。
这是上一篇文章的延续。
4. 分词工具源码
4.1.大纲
4.1.1.把源代码
这个词提取工具的源代码几乎是我编写的第一个用Python编写的好用工具中的代码。由于在不熟悉的情况下只着眼于实现必要的功能,因此与Python的简洁性相去甚远。它更像是 C 风格而不是 Python 风格。
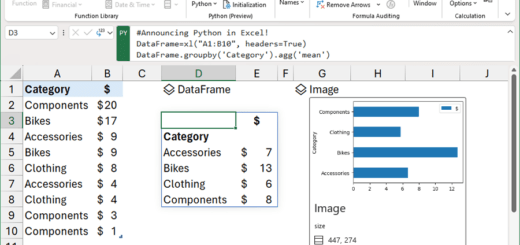
本来想把文本提取结果和词提取结果写成单独的类,但是我尝试用pandas的DataFrame做测试,效果比我想象的要好,所以我就用了DataFrame。作为奖励,通过使用 DataFrame 提供的 groupby 和 to_excel 函数,实现时间大大减少了。
“2.1.2.选择词干分析器:Mecab正如“中提到的,自然语言词干分析器 Mecab 被用于词提取。要使用其他词素分析器,请修改 get_word_list 函数。
文中插入代码的行号设置为与上传到github的源代码行号相同,所有注释尽量包含,不排除注释。
4.1.2. 分词工具函数调用关系
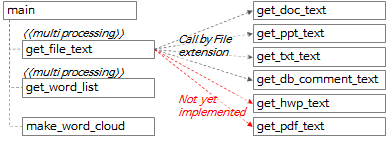
整体的函数调用关系可以概括为上图和下图的内容。
- 在main函数中,调用了get_file_text函数,从每个文件中提取以行为单位和以段落为单位的文本。
- 在get_file_text函数中,根据文件扩展名调用get_doc_text、get_ppt_text、get_txt_text、get_db_comment_text函数。
- get_hwp_text 和 get_pdf_text 函数暂时还没有实现,以后有需要的时候再实现。 (如果您有实施它的经验或知道实施的代码,请发表评论。)
- get_file_text函数的执行结果被传递给get_word_list函数,提取候选词。
- get_file_text 和 get_word_list 函数是多处理的。
- 调用 make_word_cloud 函数创建词云图。
4.2.主功能
4.2.1.参数解析
def main():
"""
지정한 경로 하위 폴더의 File들에서 Text를 추출하고 각 Text의 명사를 추출하여 엑셀파일로 저장
:return: 없음
"""
# region Args Parse & Usage set-up -------------------------------------------------------------
# parser = argparse.ArgumentParser(usage='usage test', description='description test')
usage_description = """--- Description ---
* db_comment_file과 in_path중 하나는 필수로 입력
* 실행 예시
1. File에서 text, 단어 추출: in_path, out_path 지정
python word_extractor.py --multi_process_count 4 --in_path .\\test_files --out_path .\out
2. DB comment에서 text, 단어 추출: db_comment_file, out_path 지정
python word_extractor.py --db_comment_file "table,column comments.xlsx" --out_path .\out
3. File, DB comment 에서 text, 단어 추출: db_comment_file, in_path, out_path 지정
python word_extractor.py --db_comment_file "table,column comments.xlsx" --in_path .\\test_files --out_path .\out
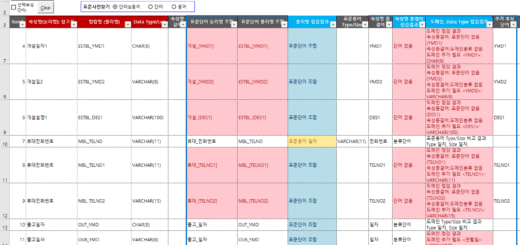
* DB Table, Column comment 파일 형식
- 첫번째 sheet(Table comment): DBName, SchemaName, Tablename, TableComment
- 두번째 sheet(Column comment): DBName, SchemaName, Tablename, ColumnName, ColumnComment"""
# ToDo: 옵션추가: 복합어 추출할지 여부, 영문자 추출할지 여부, 영문자 길이 1자리 제외여부, ...
parser = argparse.ArgumentParser(description=usage_description, formatter_class=argparse.RawTextHelpFormatter)
# name argument 추가
parser.add_argument('--multi_process_count', required=False, type=int,
help='text 추출, 단어 추출을 동시에 실행할 multi process 개수(지정하지 않으면 (logical)cpu 개수로 설정됨)')
parser.add_argument('--db_comment_file', required=False,
help='DB Table, Column comment 정보 파일명(예: comment.xlsx)')
parser.add_argument('--in_path', required=False, help='입력파일(ppt, doc, txt) 경로명(예: .\in) ')
parser.add_argument('--out_path', required=True, help='출력파일(xlsx, png) 경로명(예: .\out)')
args = parser.parse_args()
if args.multi_process_count:
multi_process_count = int(args.multi_process_count)
else:
multi_process_count = multiprocessing.cpu_count()
db_comment_file = args.db_comment_file
if db_comment_file is not None and not os.path.isfile(db_comment_file):
print('db_comment_file not found: %s' % db_comment_file)
exit(-1)
in_path = args.in_path
out_path = args.out_path
print('------------------------------------------------------------')
print('Word Extractor v%s start --- %s' % (_version_, get_current_datetime()))
print('##### arguments #####')
print('multi_process_count: %d' % multi_process_count)
print('db_comment_file: %s' % db_comment_file)
print('in_path: %s' % in_path)
print('out_path: %s' % out_path)
print('------------------------------------------------------------')
- 第 395 行:从 argparse 包创建一个 ArgumentParser 对象。
- 第 397 到 404 行:添加必要的参数并解析执行时指定的参数。
- 406~425行:设置参数为内部变量,输出设置值。
4.2.2.提取要处理的文件列表
    file_list = []
    if in_path is not None and in_path.strip() != '':
        print('[%s] Start Get File List...' % get_current_datetime())
        in_abspath = os.path.abspath(in_path)  # os.path.abspath('.') + '\\test_files'
        file_types = ('.ppt', '.pptx', '.doc', '.docx', '.txt')
        for root, dir, files in os.walk(in_abspath):
            for file in sorted(files):
                # 제외할 파일
                if file.startswith('~'):
                    continue
                # 포함할 파일
                if file.endswith(file_types):
                    file_list.append(root + '\\' + file)

        print('[%s] Finish Get File List.' % get_current_datetime())
        print('--- File List ---')
        print('\n'.join(file_list))


    if db_comment_file is not None:
        file_list.append(db_comment_file)
- 第436行:定义待处理文件对应的文件扩展名列表。
- 437~444行:在执行时指定的参数中递归查找in_path下的所有文件夹,判断每个文件是否为目标文件,如果是则加入file_list。
- 451~452行:如果执行时指定的参数中有db_comment_file,则将其添加到file_list。
4.2.3.使用多处理执行 get_file_text
    print('[%s] Start Get File Text...' % get_current_datetime())
    with multiprocessing.Pool(processes=multi_process_count) as pool:
        mp_text_result = pool.map(get_file_text, file_list)
    df_text = pd.concat(mp_text_result, ignore_index=True)
    print('[%s] Finish Get File Text.' % get_current_datetime())
    # 여기까지 text 추출완료. 아래에 단어 추출 시작
- 455~456行:在每个进程中执行以file_lsit为输入的get_file_text函数,在执行时执行指定的multi_process_count个进程,并将结果放入mp_text_result。
- 457行:concat mp_text_result的每一个list item,是一个DataFrames列表的形式,得到df_text,这是一个DataFrame。
4.2.4.使用多处理执行 get_word_list
    # ---------- 병렬 실행 ----------
    print('[%s] Start Get Word from File Text...' % get_current_datetime())
    df_text_split = np.array_split(df_text, multi_process_count)
    # mp_result = []
    with multiprocessing.Pool(processes=multi_process_count) as pool:
        mp_result = pool.map(get_word_list, df_text_split)

    df_result = pd.concat(mp_result, ignore_index=True)
    if 'DB' not in df_result.columns:
        df_result['DB'] = ''
        df_result['Schema'] = ''
        df_result['Table'] = ''
        df_result['Column'] = ''

    print('[%s] Finish Get Word from File Text.' % get_current_datetime())
    # ------------------------------
- 第463行:将df_text的行按multi_process_count进行拆分,并将每个拆分后的DataFrame放入df_text_split(列表类型)中。
- 例如df_text有1000行,multi_process_count为4,则创建4个250行的DataFrames,并创建以这4个DataFrames为item的df_text_split变量。
- 465~466行:在每个进程中执行以df_text_split为输入的get_word_list函数,在执行时执行指定的multi_process_count个进程,并将结果放入mp_result。
- 第 468 行:将 mp_result 的每个列表项(以 DataFrames 列表的形式)拼接成一个 DataFrame,df_result。
- 469-473行:'DB', 'Schema', 'Table', 'Column' 简化后续处理逻辑,避免在df_result.columns中不存在'DB',即没有指定db_comment_file时出错。添加名为 ' 的列为空值。
4.2.5.获取词频并运行 make_word_cloud
    print('[%s] Start Get Word Frequency...' % get_current_datetime())
    # df_group = pd.DataFrame(df_result.groupby(by='Word').size().sort_values(ascending=False))
    df_result_subset = df_result[['Word', 'Source']]  # 빈도수를 구하기 위해 필요한 column만 추출
    # df_group = df_result_subset.groupby(by='Word').agg(['count', lambda x: list(x)])
    df_group = df_result_subset.groupby(by='Word').agg(['count', lambda x: '\n'.join(list(x)[:10])])
    df_group.index.name = 'Word'  # index명 재지정
    df_group.columns = ['Freq', 'Source']  # column명 재지정
    df_group = df_group.sort_values(by='Freq', ascending=False)
    print('[%s] Finish Get Word Frequency.' % get_current_datetime())
    # df_group['Len'] = df_group['Word'].str.len()
    # df_group['Len'] = df_group['Word'].apply(lambda x: len(x))
    print('[%s] Start Make Word Cloud...' % get_current_datetime())
    now_dt = datetime.datetime.now().strftime("%Y%m%d%H%M%S")
    make_word_cloud(df_group, now_dt, out_path)
    print('[%s] Finish Make Word Cloud.' % get_current_datetime())
- 第 480 行:通过仅从 df_result 中选择“Word”和“Source”列来创建 df_result_subset DataFrame。
- 第 482 行:通过将 df_result_subset 与 'Word' 列分组来获取计数,从 'Source' 中提取前 10 个值并用行分隔符连接它们以创建 df_group DataFrame。
- 第483~484行:指定df_group DataFrame的索引名为'Word',列名分别为'Freq'和'Source'。
- 第 485 行:按“Freq”(词频)对 df_group 进行反向排序。
- 第491行:将df_group传给make_word_cloud函数,创建并保存词云图。
4.2.6.将提取的词表和词频保存为Excel文件,打印执行时间,退出
    print('[%s] Start Save the Extract result to Excel File...' % get_current_datetime())
    df_result.index += 1
    excel_style = {
        'font-size': '10pt'
    }
    df_result = df_result.style.set_properties(**excel_style)
    df_group = df_group.style.set_properties(**excel_style)
    out_file_name = '%s\\extract_result_%s.xlsx' % (out_path, now_dt)  # 'out\\extract_result_%s.xlsx' % now_dt

    print('start writing excel file...')
    with pd.ExcelWriter(path=out_file_name, engine='xlsxwriter') as writer:
        df_result.to_excel(writer,
                           header=True,
                           sheet_name='단어추출결과',
                           index=True,
                           index_label='No',
                           freeze_panes=(1, 0),
                           columns=['Word', 'FileName', 'FileType', 'Page', 'Text', 'DB', 'Schema', 'Table', 'Column'])
        df_group.to_excel(writer,
                          header=True,
                          sheet_name='단어빈도',
                          index=True,
                          index_label='단어',
                          freeze_panes=(1, 0))
        workbook = writer.book
        worksheet = writer.sheets['단어빈도']
        wrap_format = workbook.add_format({'text_wrap': True})
        worksheet.set_column("C:C", None, wrap_format)

    # print('finished writing excel file')
    print('[%s] Finish Save the Extract result to Excel File...' % get_current_datetime())

    end_time = time.time()
    # elapsed_time = end_time - start_time
    elapsed_time = str(datetime.timedelta(seconds=end_time - start_time))
    print('------------------------------------------------------------')
    print('[%s] Finished.' % get_current_datetime())
    print('overall elapsed time: %s' % elapsed_time)
    print('------------------------------------------------------------')
- 495~501行:设置Excel字体大小为10磅,并设置要保存的Excel文件的路径和文件名。
- 504~521行:使用pandas ExcelWriter将df_result和df_group DataFrame保存为Excel文件。
- 第526行到第532行:计算执行耗时,输出,退出。
这篇文章很长,所以我分两篇发表。下一篇继续。
<< 相关文章列表 >>


你好
我使用单词提取工具单词代码和您发布的“pdfplumber”创建了一个 get_pdf_text 函数。
我可以在评论或电子邮件中向您展示吗?
你好!
我使用您发布的单词提取器源代码实现了 get_pdf_text 函数。
确认在现有代码的文件扩展名相关部分添加pdf并添加get_pdf_tex函数时有效。
让我知道需要更正的地方,我会处理的。
你需要 pip install pdfplumber。
导入 pdfplumber
def get_pdf_text(file_name) -> 数据框:
开始时间 = 时间.时间()
print('\r\nget_txt_text: ' + file_name)
df_text = pd.DataFrame()
pdf_file = pdfplumber.open(文件名)
页 = 0
对于 pdf_file.pages 中的 pg:
texts = pg.extract_text()
页 += 1
对于 texts.split() 中的文本:
如果 text.strip() != ”:
sr_text = Series([file_name, 'pdf', page, text, f'{file_name}:{page}:{text}'],
index=['FileName', 'FileType', 'Page', 'Text', 'Source'])
df_text = df_text.append(sr_text, ignore_index=True)
print('文本数:%s' % str(df_text.shape[0]))
print('页数:%d' % 页)
pdf_file.close()
结束时间 = 时间.时间()
elapsed_time = str(datetime.timedelta(seconds=end_time – start_time))
print('[pid:%d] get_pdf_text 经过时间:%s' % (os.getpid(), elapsed_time))
返回 df_text
感谢您分享 get_pdf_text 函数源代码。
你写的源代码是缩进的,但是因为缩进不显示在WordPress评论中,所以看起来有点不方便。
让我们将缩进设置为可见。
设置缩进可见时,如果需要缩进的原始源码,我再上传。